Why Is My Ultra-Short Throw Projector Image Warping On The Wall?
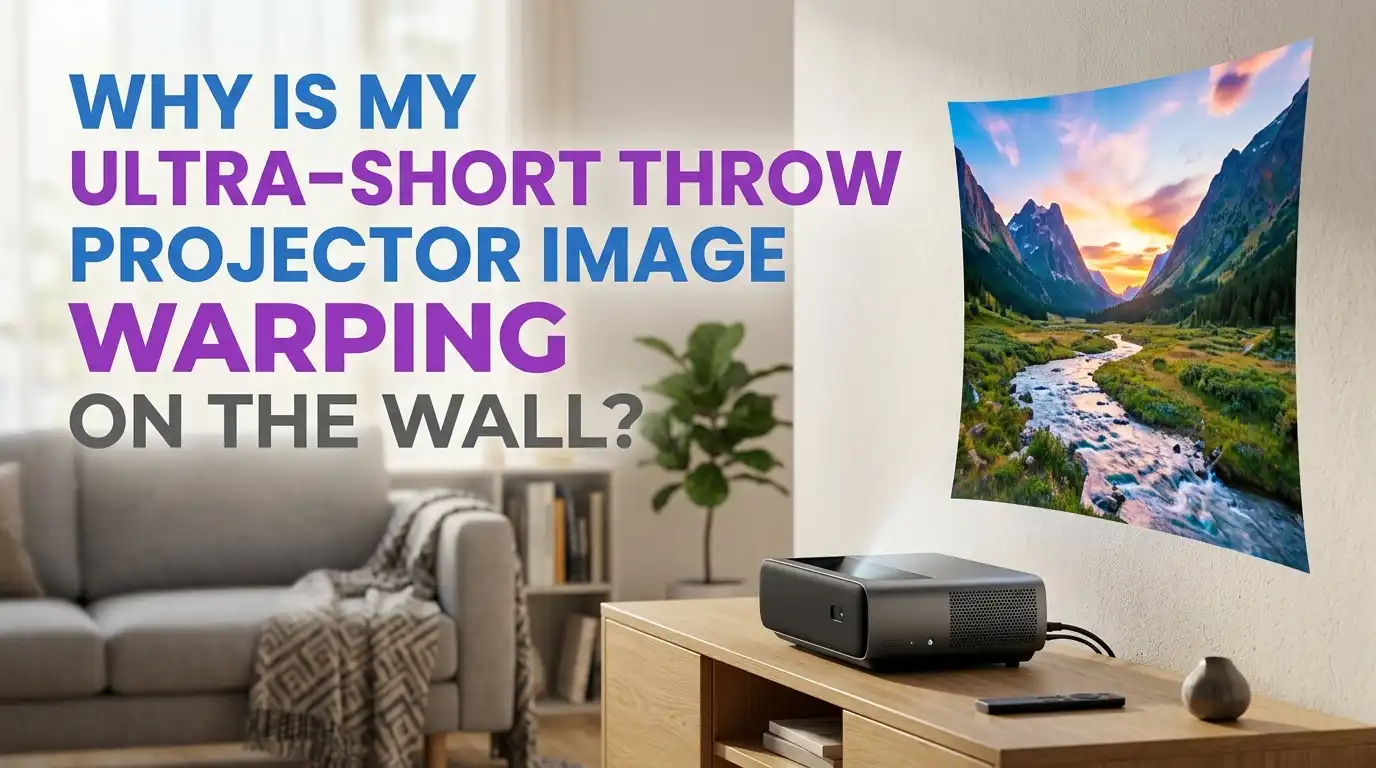
You just unboxed your brand new ultra short throw projector. You placed it on your media console, pointed it at the wall, and powered it on. Then your heart sinks. The image looks wavy. The top edge curves like a smile. One corner droops. The perfect rectangle you expected is nowhere to be seen.
You are not alone. This is the single most common frustration among new UST projector owners. Forums and social media groups overflow with posts from confused users staring at distorted images on their walls.
The good news is that this problem almost always has a solution. And in most cases, your projector is not defective. The image warping you see comes from a handful of predictable causes that you can diagnose and fix yourself.
Key Takeaways:
- Your wall is almost never perfectly flat. UST projectors shoot light at an extremely steep angle from just inches below the screen. This geometry acts like a magnifying glass for every tiny bump, bow, and ripple in your drywall. A deviation as small as one or two millimeters can create visible waves in a 100 inch image. The number one cause of image warping is simply an uneven wall surface, not a faulty projector.
- A proper CLR or UST specific ALR screen fixes most warping instantly. These screens use a tensioned, perfectly flat surface stretched over a rigid frame. A fixed frame or tab tensioned screen gives your projector the flawless canvas it demands. Many users report that their warping vanished the moment they installed a proper screen.
- Physical alignment beats digital correction every time. Keystone correction and corner adjustment tools can help in a pinch, but they degrade your image quality. They work by digitally squishing pixels, which reduces sharpness and brightness. Always try to get the geometry right through physical placement first, then use digital tools only as a last resort for tiny final tweaks.
- Your media console height and distance matter more than you think. UST projectors need a very specific vertical offset to hit the wall correctly. If your console is too tall, the image will climb toward the ceiling. If the projector sits too far from the wall, the picture will be too large and misshapen. Always check your projector’s throw ratio specifications before you set anything up.
- Environmental factors can slowly warp your image over time. If your screen mounts to an exterior wall, seasonal temperature and humidity changes can cause the drywall to expand, contract, and bow. Some users report having to realign their projector every few months as the wall shifts. This is a hidden culprit that frustrates many long term owners.
Why UST Projectors Are So Sensitive To Wall Imperfections
Standard long throw projectors sit across the room and shoot light almost straight at the wall. Their light rays travel a long distance and approach the surface at a relatively narrow angle. This means small bumps and dips in the wall do not affect the image much. The light simply glides over them.
A UST projector works very differently. It sits just inches from the wall and fires its image upward at a steep angle, often around 150 degrees from horizontal. Think of it like holding a flashlight almost parallel to a tabletop. Every grain of dust, every tiny ridge, every paint drip casts a long shadow. The steep angle stretches imperfections across the image like a funhouse mirror.
The physics is brutal. A wall that looks perfectly flat to your naked eye might have a 2 millimeter dip in the center. A standard projector would not notice this at all.
A UST projector will turn that 2 millimeter dip into a visible wave that spans several inches of your image. The shorter the throw ratio, the more dramatic this effect becomes. Projectors with a 0.19:1 or 0.20:1 throw ratio are the most sensitive of all.
Pros and Cons of Projecting Directly On A Wall:
Pros: Zero cost beyond the projector itself. No installation hassle. No screen taking up permanent wall space. A minimalist look that many people love.
Cons: Nearly impossible to achieve perfectly flat geometry unless you invest in professional wall leveling. Every wall texture, bump, and bow shows up clearly. You lose the brightness and contrast benefits that a CLR screen provides. Light spills onto the ceiling and surrounding wall areas.
How To Test If Your Wall Is The Real Culprit
Before you spend money on a screen or waste hours adjusting settings, run a simple diagnostic test. This will tell you definitively whether your wall is causing the warping.
First, grab a flashlight or the LED light on your phone. Turn off all the room lights so it is as dark as possible. Hold the flashlight against the wall and shine it sideways along the surface, like a car’s headlights on a foggy road.
Walk along the entire projection area and watch for shadows. Any raised areas or depressions will cast long, obvious shadows that you would never see under normal lighting. This technique, often called raking light inspection, reveals every flaw in your wall.
Second, try the location change test. Move your projector to a completely different wall, even if the setup is awkward and temporary. Project a test pattern with straight horizontal and vertical lines. If the warp pattern changes shape or location, your wall is the problem.
The Screen Solution: Fixed Frame Vs. Tab Tensioned Vs. Floor Rising
The single most effective fix for UST image warping is buying a proper projection screen. This is not an upsell. It is a practical necessity for anyone who wants a perfectly rectangular image. A screen gives your projector a surface that is engineered to be flat, smooth, and optically optimized.
Fixed frame screens are the gold standard for flatness. They consist of a rigid metal frame that you mount permanently on your wall. The screen material stretches over this frame and attaches with springs or snaps, pulling it drum tight.
There is simply no way for the surface to ripple, bow, or sag. Fixed frame screens also provide the best value because they eliminate the mechanical complexity of retractable systems. The downside is that they are always visible. Your living room wall now has a large black rectangle on it 24/7.
Tab tensioned motorized screens give you the best of both worlds. The screen rolls down from a ceiling mounted or wall mounted housing when you want to watch something. Thin cords or tabs run along the sides and pull the material outward, keeping it flat.
Pros and Cons At A Glance:
Fixed Frame: Maximum flatness and best value. Permanent wall presence. Easiest DIY installation except for locating wall studs.
Tab Tensioned Motorized: Hidden when not in use. Very good flatness. Higher cost. Requires power and ceiling or wall mounting.
Floor Rising: Cleanest aesthetic. No wall or ceiling mounts. Highest cost. Needs clearance in front of the projector.
CLR And ALR Screens: Why Standard Screens Make UST Images Worse
Not all projection screens work with UST projectors. This is a critical detail that many first time buyers miss. A standard white screen or a generic ALR screen designed for long throw projectors will make your image worse, not better.
Standard ALR screens use an optical coating that rejects light coming from the sides and above. This works great for a ceiling mounted projector across the room. But a UST projector fires light from below, at a very steep angle. A standard ALR screen will reject that light too. The result is a dark, dim image that looks terrible.
You need a CLR screen or a UST specific ALR screen. These screens use a microscopic sawtooth structure on their surface. The upward facing side of each tiny ridge catches the light from your projector and reflects it toward your seating area.
Pros and Cons:
Pros: CLR screens deliver sharper geometry, better contrast, deeper blacks, and visible brightness in lit rooms. They solve the wall flatness problem completely.
Cons: CLR screens cost more than generic screens. They have a narrower viewing angle, typically 160 degrees. Colors can shift slightly when viewed from extreme side angles. Good CLR screens start at several hundred dollars for smaller sizes and climb from there.
Mastering Physical Alignment Without Digital Correction
You have your screen installed. Now you need to align the projector. Many people jump straight into the settings menu and start dragging keystone sliders. That is a mistake. Physical alignment should always come first. Here is the step by step process that experienced installers use.
Step one: Level everything. Use a bubble level on your media console, on the projector itself, and on the screen frame. Everything must be level horizontally. If your floor has a slight slope, use shims under the console feet. A perfectly level foundation removes half the alignment struggle before you even turn the projector on.
Step two: Center the projector. Measure the width of your screen. Find the exact center point. Now measure the width of your projector and find its center. Align these two center points as precisely as possible. Even a half inch offset will create an asymmetrical trapezoid that is hard to correct later.
Step three: Set the correct distance. Look up your projector’s throw ratio in the manual or online throw distance calculator. For a 100 inch screen with a 0.25:1 throw ratio, the projector needs to sit roughly 25 inches from the wall.
Step four: Rotate and tilt in the correct order. First, rotate the projector left or right until both sides of the image have the same angle. If the left side is taller than the right, rotate the projector slightly to the right.
Pros and Cons:
Pros: Physical alignment preserves 100% of your projector’s native resolution and brightness. No pixels are discarded. No processing lag is added. This is what home theater purists insist on.
Cons: It takes patience. You might spend 30 to 45 minutes getting everything perfect. Some setups require adding shims or coins under feet, which feels improvised. And if your floor or wall shifts seasonally, you may need to realign periodically.
When And How To Use Keystone And Corner Correction Tools
Sometimes physical alignment can only get you 95% of the way there. Maybe your media console sits slightly off center and cannot be moved. Maybe your screen has a tiny manufacturing irregularity. This is where digital correction tools earn their keep. But you must use them with a clear understanding of what you are sacrificing.
Keystone correction digitally squishes the image to make a trapezoid look like a rectangle. If the top of your image is wider than the bottom, keystone correction compresses the top pixels inward. The problem is that the projector’s imaging chip has a fixed number of pixels.
When you compress the top, you are throwing away pixels. A 4K projector using moderate keystone correction might effectively display closer to 3K resolution.
The image also gets slightly dimmer because the unused pixels are still receiving light from the lamp or laser. That light spills onto the wall as a faint gray border around your image.
Pros and Cons:
Pros: Quick and easy. Can fix alignment problems that physical adjustment alone cannot solve. Makes imperfect installations watchable.
Cons: Reduces effective resolution. Lowers brightness. Adds a faint gray border around the image. May introduce slight input lag, which matters for gaming.
Fixing A Bowed Or Curved Screen Frame
You installed a fixed frame screen. You aligned the projector perfectly. Yet the top edge of your image still shows a slight smile shaped curve.
This almost always means your screen frame is bowing. Fixed frame screens are rigid, but they are not immune to warping. The metal frame can bend slightly if the wall behind it is uneven.
Here is how to diagnose a bowed screen. Project a grid pattern or a white rectangle onto the screen. Look closely at the top edge. If the projected image has a curve that the screen’s black border does not match, the projector alignment is off. But if the black border itself follows the curve, your screen frame is bowing.
The fix involves shimming. Find the point where the curve dips inward. Slide a thin shim, like a folded piece of cardboard or a plastic wedge, between the wall and the screen frame at that spot.
Pros and Cons:
Pros: Shimming is a cheap, reversible fix. It does not involve any digital correction so image quality stays pristine. Most people can do it in under 30 minutes.
Cons: Requires patience and a steady hand. You might need to unmount part of the screen. If the wall bow is severe, no amount of shimming will fully correct it and you may need to address the wall itself.
Wall Preparation: Skim Coating And Sanding For A Projector Ready Surface
If you are determined to project directly onto a wall, you need to prepare that wall properly. A standard painted drywall surface is rarely flat enough for a UST projector. This is a DIY project that requires some skill but can produce excellent results if done carefully.
The process is called skim coating. You apply a thin layer of joint compound across the entire wall surface using a wide drywall knife or trowel.
The goal is to fill in every low spot and create one continuous flat plane. Start with a clean, dust free wall. Mix your joint compound to a smooth, creamy consistency. Apply it in thin layers, working from top to bottom. Let each layer dry completely, usually 24 hours, before applying the next one.
After the final coat dries, you need to sand the wall perfectly smooth. Use a pole sander with fine grit sandpaper, around 220 grit. Work in a circular motion and apply even pressure. Wear a dust mask because this creates a lot of fine dust.
Pros and Cons:
Pros: No visible screen on your wall. Clean and minimalist. One time cost of materials is lower than buying a quality screen.
Cons: Labor intensive. Takes several days including drying time. Creates a lot of dust. Requires moderate DIY skill. Still will not reject ambient light like a CLR screen does.
Getting Your Media Console Height And Throw Distance Right
UST projector placement is a precise science. You cannot simply place the projector on any piece of furniture and expect a perfect image. The height of your media console and the distance from the wall determine everything about your final picture geometry.
Every UST projector has a specification called vertical offset. This is the distance from the top surface of the projector to the bottom edge of the projected image.
For many popular models, this offset is around 12 to 15 inches when projecting a 100 to 120 inch image. If your media console is 20 inches tall, the bottom of your image will start roughly 32 to 35 inches above the floor. That might push the top of a 120 inch image uncomfortably close to your ceiling.
Measure before you buy any furniture. Take your projector’s vertical offset specification. Add your console height. Then add the image height for your desired screen size.
Pros and Cons of Wall Mounting Vs. Console Placement:
Console: Simple and requires no drilling. Easy to adjust. Limited by furniture depth and height constraints.
Wall Mount: Frees up console space. More flexible placement. Requires drilling into wall studs. Harder to adjust after installation.
Firmware Updates And Factory Resets: The Software Side Of Warping
Sometimes the problem is not physical at all. Your projector’s internal software can introduce image geometry issues, especially after a power surge, an interrupted update, or extended use without a restart. Before you rearrange your entire living room, try these software fixes.
First, check for a firmware update. Manufacturers regularly release updates that fix bugs, improve image processing, and sometimes address edge geometry issues.
Go into your projector’s settings menu, find the system or about section, and look for a software update option. Connect to Wi-Fi if you haven’t already. Download and install any available updates. After the update completes and the projector restarts, check if the image geometry has improved.
Second, perform a factory reset. This wipes all your custom settings and returns the projector to its out of the box state. It can clear corrupted geometry correction data that might be causing odd warping behavior. Find the reset option in your settings menu, usually under system or storage and reset.
Third, check your HDMI source. Sometimes the warping originates from the source device rather than the projector. Try connecting a different device, like a laptop instead of a streaming stick.
Pros and Cons:
Pros: Free, fast, and requires no physical labor. Can instantly resolve issues caused by corrupted settings.
Cons: A factory reset wipes all your picture calibration settings. You will need to redo brightness, contrast, and color adjustments. Firmware updates occasionally introduce new bugs, though this is rare.
Environmental Factors: Temperature, Humidity, And Seasonal Wall Movement
Your wall is not a static object. It breathes, expands, and contracts with the seasons. This is especially true for exterior walls, which face the outside and experience significant temperature swings. A UST projector that looked perfect in July might show edge warping in January.
Wood studs inside your walls absorb moisture from the air. In humid summer months, they swell slightly. In dry winter months, they shrink. Drywall attached to those studs moves with them.
Over a span of several feet, this movement can add up to a few millimeters of bowing. Remember what we learned earlier: a few millimeters of wall movement creates visible warping with a UST projector.
Homes in climates with large seasonal temperature swings are most affected. Someone in Michigan might need to realign their projector two or three times a year as the wall shifts. Someone in coastal California with a stable interior climate might never notice any change.
Pros and Cons of Different Approaches:
Standoff Brackets: Reduces screen movement. Requires more complex installation. Looks slightly less flush against the wall.
Freestanding Screen: Eliminates wall dependency. Costs more. Takes up floor space.
Regular Realignment: Costs nothing. Takes time and patience. Only needed on exterior walls in variable climates.
When To Accept Imperfection And When To Call A Professional
Here is an honest truth that few people share: no UST projector setup is mathematically perfect. A 120 inch image with edges that are accurate to within one eighth of an inch is excellent.
If you are sitting 10 feet away watching a movie, you will never notice a one eighth inch deviation. Many forum users drive themselves crazy chasing pixel perfect geometry that is invisible during actual content playback.
So when should you accept a tiny imperfection? If all four corners of your test pattern land within the screen’s black border, you are in great shape.
If the top edge has a wave so small that you cannot see it while watching a movie, let it go. If the image looks sharp and rectangular during normal content, stop adjusting. The test pattern is not the movie. Do not let perfect be the enemy of excellent.
When should you call a professional? If the warping is so severe that straight lines look obviously curved during movies, get help. If you have tried every physical alignment technique in this guide and the image still looks bad, a professional installer has tools and experience you lack.
Pros and Cons:
DIY: Saves money. Teaches you how your system works. Takes time and can be frustrating. Risk of making things worse.
Professional: Quick and guaranteed results. Costly. You learn less about your own equipment. Not all installers are equally skilled with UST projectors, so check reviews carefully.
FAQs
Can I use a regular white projector screen with my UST projector?
You can, but you should not. Regular white screens reflect light in all directions equally. A UST projector fires light from below at a steep angle, and a standard screen will reflect much of that light upward toward the ceiling instead of toward your eyes. The image will look dim and washed out.
Will keystone correction ruin my 4K picture quality?
It will not ruin it, but it will reduce it. Keystone correction works by digitally scaling and compressing the image to fit a trapezoid into a rectangle. This process discards pixels. On a 4K projector using moderate keystone correction, your effective resolution might drop to roughly 3K or 3.5K.
Why does my UST image look fine in the morning but warped in the evening?
This is almost certainly a temperature and humidity issue. During the day, especially if sunlight hits the wall, the drywall and studs expand slightly from heat. At night they cool and contract. This tiny movement can be enough to change the image geometry on a UST projector.
My projector image has a curved top but only on one side. What does that mean?
A curved top that affects only one side of the image usually indicates that the projector is not perfectly square to the screen. The projector is rotated slightly, causing one side of the image to stretch more than the other. Try rotating the projector a tiny amount in the direction opposite the curve.
Do I really need a screen or can I just skim coat my wall?
You can absolutely skim coat your wall and get excellent flatness. Many people do this successfully. A properly skim coated and sanded wall can be flatter than some budget screens. However, a wall will never match the optical performance of a good CLR screen.